Friday, May 22, 2020

HaCode - FUD Backdoor Generator / Remote Administration Tool

Related articles


  1. Social Hacking
  2. Hacking Etico Certificacion
  3. Hacking 2019
  4. Libro De Hacking
  5. Paginas De Hackers
  6. Hacking Hardware Tools
  7. Sean Ellis Hacking Growth
  8. Hacking Con Buscadores Pdf
  9. Herramientas De Seguridad Informatica
  10. Hacking Libro
  11. Programas Para Hackear
  12. Chema Alonso Libros
  13. Aprender Hacking Desde Cero
  14. Que Significa Hat
  15. Hacking Time

Top Linux Commands Related To Hardware With Descriptive Definitions


Commands in Linux are just the keys to explore and close the Linux. As you can do things manually by simple clicking over the programs just like windows to open an applications. But if you don't have any idea about commands of Linux and definitely you also don't know about the Linux terminal. You cannot explore Linux deeply. Because terminal is the brain of the Linux and you can do everything by using Linux terminal in any Linux distribution. So, if you wanna work over the Linux distro then you should know about the commands as well. In this blog you will exactly get the content about Linux hardware commands which are related to CPU and memory processes.

dmesg

The dmesg command is used in Linux distribution for the sake of detecting hardware and boot messages in the Linux system.

cat /proc/cpuinfo

The cat command is basically used to read something over the terminal like cat index.py will display all the content which exist in index.py over the terminal. So cat /proc/cpuinfo will display the model of the CPU over the terminal.

cat /proc/meminfo

This command is similar to the above command but the only difference is that this command shows the information of hardware memory over the terminal. Because it will open the memory info file over the terminal.

cat /proc/interrupts

This command is also similar to the above command but there is the difference of one thing that this command will display lists the number of interrupts per CPU per input output device.

lshw

This command is used in Linux operating system to displays information on hardware configuration of the system in Linux.

lsblk

The "lsblk" command is used in Linux operating system to displays block device related information in the Linux operating system.

dmidecode

The "dmidecode" command is used in Linux distributions to display the information about hardware from the BIOS.

hdparm -i /dev/sda

The hdparm command basically used to display the information about the disks available in the system. If you wanna know the information about the "sda" disk so just type "hdparm -i /dev/sda" and if you wanna know the information about "sdb" so just type "hdparm -i /dev/sdb".

hdparm -tT

The "hdparm" command is used for displaying the information about disks as we discussed in above command. If you wanna do a read speed test on the disk sda or sdb just type the command "hdparm -tT /dev/sda".

badblocks -s /dev/sda

This command is used in linux to display test operations for unreadable blocks on disk sda. If the command is like "badblocks -s /dev/sdb" it will display test operations for unreadable blocks on disk sdb.

Related links


Thursday, May 21, 2020

Security Surprises On Firefox Quantum

This morning I've found an scaring surprise on my Firefox Quantum. Casually it was connected to a proxy when an unexpected connection came up, the browser  was connecting to an unknown remote site via HTTP and downloading a ZIP that contains an ELF shared library, without any type of signature on it.

This means two things

1) the owner of that site might spread malware infecting many many people.
2) the ISP also might do that.


Ubuntu Version:


Firefox Quantum version:


The URL: hxxp://ciscobinary.openh264.org/openh264-linux64-0410d336bb748149a4f560eb6108090f078254b1.zip


The zip contains these two files:
  3f201a8984d6d765bc81966842294611  libgmpopenh264.so
  44aef3cd6b755fa5f6968725b67fd3b8  gmpopenh264.info

The info file:
  Name: gmpopenh264
  Description: GMP Plugin for OpenH264.
  Version: 1.6.0
  APIs: encode-video[h264], decode-video[h264]

So there is a remote codec loading system that is unsigned and unencrypted, I think is good to be aware of it.

In this case the shared library is a video decoder, but it would be a vector to distribute malware o spyware massively, or an attack vector for a MITM attacker.


More articles


How To Install Windscribe - The Best Free VPN On GNU/Linux Distros?


Why should you use Windscrive?
   Windscribe is well-known for their free VPN service but they also have a paid version. Only with a free account, you will get 10 countries to connect through and change your real IP address and 10GB of free traffic (if you use an email to sign up Windscribe), and unlimited devices.

   The Free version is awesome, but the Pro one is even better! With Pro version you will get Unlimited DataUnblock over 60 Countries and 110 CitiesConfig Generator (OpenVPN, IKEv2, SOCKS5), and full protection from R.O.B.E.R.T.

   For your information, Windscribe is one of the best VPN services in the category Free AuditValue Audit and Overall Audit in BestVPN.com Awards 2019 (Read the White Paper here). You totally can believe in Windscribe (100% no logs).

   And about R.O.B.E.R.T, it's an advanced DNS level blocker that protects you from MalwareAds and TrackersSocial trackingPornGamblingFake NewsClickbait and Cryptominers. Read more about R.O.B.E.R.T.


Anyway, Windscribe helps you:
  • Stop tracking and browse privately: Governments block content based on your location. Corporations track and sell your personal data. Get Windscribe and take back control of your privacy.
  • Unblock geo-restricted content: Windscribe masks your IP address. This gives you unrestricted and private access to entertainment, news sites, and blocked content in over 45 different countries.
  • Take your browsing history to your grave: Protect your browsing history from your network administrator, ISP, or your mom. Windscribe doesn't keep any logs, so your private data stays with you.
  • Stop leaking personal information: Prevent hackers from stealing your data while you use public WIFI and block annoying advertisers from stalking you online.
  • Go beyond basic VPN protection: For comprehensive privacy protection, use our desktop and browser combo (they're both free).

   Windscribe also supports Chrome browser, Firefox browser, Opera browser, Smart TV, Routers, Android, iOS, BlackBerry, Windows OS, Mac OS X and GNU/Linux OS, you name it.

   You can install Windscribe on Ubuntu, Debian, Fedora, CentOS, Arch Linux and their based distros too.

   But to install and safely use Internet through Windscribe, you must sign up an account first. If you already have an account then let's get started.

How to install Windscribe on Arch and Arch-based distros?
   First, open your Terminal.

   For Arch Linux and Arch-based distro users, you can install Windscribe from AUR. Run these commands without root to download and install Windscribe on your Arch:


   For other distro users, go to VPN for Linux - Windscribe choose the binary file that compatible with your distro (.DEB for Debian and Ubuntu based, .RPM for Fedora and CentOS based) and then install it.
dpkg -i [Windscribe .DEB package]
rpm -ivh [Windscribe .RPM package]


   Or you can scroll down to Pick Your Distro, click to the distro version you use, or click to the distro version that your distro is based on and follow the instructions.

   Now enter these commands to auto-start a and log in to Windscribe.

   Enter your username and password and then you can enjoy Windscribe's free VPN service.

How to use Windscribe on Linux?
   This is Windscribe list of commands (windscribe --help):
   If you want Windscribe to chooses the best location for you, use windscribe connect best.

   But if you want to choose location yourself, here is the list of Windscribe's locations:
   *Pro only
   Example, i want to connect to "Los Angeles - Dogg", i use windscribe connect Dogg.

   If you want to stop connecting through Windscribe use windscribe disconnect.

   For some reasons, you want to log out Windscribe from your device, use windscribe logout.

I hope this article is helpful for you 😃


Continue reading


TLS-Attacker V2.2 And The ROBOT Attack

We found out that many TLS implementations are still vulnerable to different variations of a 19-year old Bleichenbacher's attack. Since Hanno argued to have an attack name, we called it ROBOT: https://robotattack.org

Given the new attack variants, we released a new version of TLS-Attacker 2.2, which covers our vulnerabilities.

Bleichenbacher's attack from 1998

In 1998, Daniel Bleichenbacher discovered that the error messages given by SSL servers for errors in the PKCS #1 1.5 padding allow an adversary to execute an adaptive-chosen ciphertext attack. This attack also belongs to the category of padding oracle attacks. By performing the attack, the adversary exploits different responses returned by the server that decrypts the requests and validates the PKCS#1 1.5 padding. Given such a server, the attacker can use it as an oracle and decrypt ciphertexts.
We refer to one of our previous blog posts for more details.

OK, so what is new in our research?

In our research we performed scans of several well-known hosts and found out many of them are vulnerable to different forms of the attack. In the original paper, an oracle was constructed from a server that responded with different TLS alert messages. In 2014, further side-channels like timings were exploited. However, all the previous studies have considered mostly open source implementations. Only a few vulnerabilities have been found.

In our scans we could identify more than seven vulnerable products and open source software implementations, including F5, Radware, Cisco, Erlang, Bouncy Castle, or WolfSSL. We identified new side-channels triggered by incomplete protocol flows or TCP socket states.

For example, some F5 products would respond to a malformed ciphertext located in the ClientKeyExchange message with a TLS alert 40 (handshake failure) but allow connections to timeout if the decryption was successful. We could observe this behaviour only when sending incomplete TLS handshakes missing ChangeCipherSpec and Finished messages.
See our paper for more interesting results.

Release of TLS-Attacker 2.2

These new findings motivated us to implement the complete detection of Bleichenbacher attacks in our TLS-Attacker. Before our research, TLS-Attacker had implemented a basic Bleichenbacher attack evaluation with full TLS protocol flows. We extended this evaluation with shortened protocol flows with missing ChangeCipherSpec and Finished messages, and implemented an oracle detection based on TCP timeouts and duplicated TLS alerts. In addition, Robert (@ic0ns) added many fixes and merged features like replay attacks on 0-RTT in TLS 1.3.
You can find the newest version release here: https://github.com/RUB-NDS/TLS-Attacker/releases/tag/v2.2

TLS-Attacker allows you to automatically send differently formatted PKCS#1 encrypted messages and observe the server behavior:
$ java -jar Attacks.jar bleichenbacher -connect [host]:[port]
In case the server responds with different error messages, it is most likely vulnerable. The following example provides an example of a vulnerable server detection output:
14:12:42 [main] CONSOLE attacks.impl.Attacker - A server is considered vulnerable to this attack if it responds differently to the test vectors.
14:12:42 [main] CONSOLE attacks.impl.Attacker - A server is considered secure if it always responds the same way.
14:12:49 [main] CONSOLE attacks.impl.Attacker - Found a difference in responses in the Complete TLS protocol flow with CCS and Finished messages.
14:12:49 [main] CONSOLE attacks.impl.Attacker - The server seems to respond with different record contents.
14:12:49 [main] INFO attacks.Main - Vulnerable:true
In this case TLS-Attacker identified that sending different PKCS#1 messages results in different server responses (the record contents are different).
Related posts

Wednesday, May 20, 2020

5 BEST HACKING BOOKS 2018

Most of the people don't go with videos and read books for learning. Book reading is a really effective way to learn and understand how things work. There are plenty of books about computers, security, penetration testing and hacking. Every book shows a different angle how things work and how to make system secure and how it can be penetrated by hackers. So, here I have gathered a few of the best hacking books of 2018 available on the market.

BEST HACKING BOOKS OF 2018

There are hundreds of books about hacking, but I have streamlined few of best hacking books of 2018.

1. THE HACKER'S PLAYBOOK PRACTICAL GUIDE TO PENETRATION

This handbook is about experting yourself with the hacking techniques in the hacker's way. This is about penetration testing that how hackers play their techniques and how we can counter them.

CONTENTS

  • Introduction
  • Pregame – The Setup
  • Setting Up a Penetration Testing Box
  • Before the Snap – Scanning the Network
  • The Drive – Exploiting Scanner Findings
  • The Throw – Manual Web Application Findings
  • The Lateral Pass – Moving Through the Network
  • The Screen – Social Engineering
  • The Onside Kick – Attacks that Require Physical Access
  • The Quarterback Sneak – Evading AV
  • Special Teams – Cracking, Exploits, Tricks
  • Post Game Analysis – Reporting
Download the Hacker's Playbook Practical Guide to Penetration.

2. ANDROID HACKER'S HANDBOOK

The Android Hacker's Handbook is about how the android devices can be hacked. Authors chose to write this book because the field of mobile security research is so "sparsely charted" with disparate and conflicted information (in the form of resources and techniques).

CONTENTS

  • Chapter 1 Looking at the Ecosystem
  • Chapter 2 Android Security Design and Architecture
  • Chapter 3 Rooting Your Device
  • Chapter 4 Reviewing Application Security
  • Chapter 5 Understanding Android's Attack Surface
  • Chapter 6 Finding Vulnerabilities with Fuzz Testing
  • Chapter 7 Debugging and Analyzing Vulnerabilities
  • Chapter 8 Exploiting User Space Software
  • Chapter 9 Return Oriented Programming
  • Chapter 10 Hacking and Attacking the Kernel
  • Chapter 11 Attacking the Radio Interface Layer
  • Chapter 12 Exploit Mitigations
  • Chapter 13 Hardware Attacks
Download Android Hacker's Handbook.

3. PENETRATION TESTING: A HANDS-ON INTRODUCTION TO HACKING

This book is an effective practical guide to penetration testing tools and techniques. How to penetrate and hack into systems. This book covers beginner level to highly advanced penetration and hacking techniques.

CONTENTS

  • Chapter 1: Setting Up Your Virtual Lab
  • Chapter 2: Using Kali Linux
  • Chapter 3: Programming
  • Chapter 4: Using the Metasploit Framework
  • Chapter 5: Information Gathering
  • Chapter 6: Finding Vulnerabilities
  • Chapter 7: Capturing Traffic
  • Chapter 8: Exploitation
  • Chapter 9: Password Attacks
  • Chapter 10: Client-Side Exploitation
  • Chapter 11: Social Engineering
  • Chapter 12: Bypassing Antivirus Applications
  • Chapter 13: Post Exploitation
  • Chapter 14: Web Application Testing
  • Chapter 15: Wireless Attacks
  • Chapter 16: A Stack-Based Buffer Overflow in Linux
  • Chapter 17: A Stack-Based Buffer Overflow in Windows
  • Chapter 18: Structured Exception Handler Overwrites
  • Chapter 19: Fuzzing, Porting Exploits, and Metasploit Modules
  • Chapter 20: Using the Smartphone Pentesting Framework
Download Penetration Testing: A Hands-On Introduction To Hacking.

4. THE SHELLCODER'S HANDBOOK

This book is about learning shellcode's of the OS and how OS can be exploited. This book is all about discovering and exploiting security holes in devices to take over.
Authors: Chris Anley, John Heasman, Felix "FX" Linder, Gerardo Richarte.

CONTENTS

  • Stack Overflows
  • Shellcode
  • Introduction to Format String Bugs
  • Windows Shellcode
  • Windows Overflows
  • Overcoming Filters
  • Introduction to Solaris Exploitation
  • OS X Shellcode
  • Cisco IOS Exploitation
  • Protection Mechanisms
  • Establishing a Working Environment
  • Fault Injection
  • The Art of Fuzzing
  • Beyond Recognition: A Real Vulnerability versus a Bug
  • Instrumented Investigation: A Manual Approach
  • Tracing for Vulnerabilities
  • Binary Auditing: Hacking Closed Source Software
  • Alternative Payload Strategies
  • Writing Exploits that Work in the Wild
  • Attacking Database Software
  • Unix Kernel Overflows
  • Exploiting Unix Kernel Vulnerabilities
  • Hacking the Windows Kernel
Download The ShellCoder's HandBook.

5. THE HACKER'S HANDBOOK WEB APPLICATION SECURITY FLAWS

This handbook is about finding and exploiting the web applications.
Authors: Dafydd Stuttard, Marcus Pinto.

CONTENTS

  • Chapter 1 Web Application (In)security
  • Chapter 2 Core Defense Mechanisms
  • Chapter 3 Web Application Technologies
  • Chapter 4 Mapping the Application
  • Chapter 5 Bypassing Client-Side Controls
  • Chapter 6 Attacking Authentication
  • Chapter 7 Attacking Session Management
  • Chapter 8 Attacking Access Controls
  • Chapter 9 Attacking Data Stores
  • Chapter 10 Attacking Back-End Components
  • Chapter 11 Attacking Application Logic
  • Chapter 12 Attacking Users: Cross-Site Scripting
  • Chapter 13 Attacking Users: Other Techniques
  • Chapter 14 Automating Customized Attacks
  • Chapter 15 Exploiting Information Disclosure
  • Chapter 16 Attacking Native Compiled Applications
  • Chapter 17 Attacking Application Architecture
  • Chapter 18 Attacking the Application Server
  • Chapter 19 Finding Vulnerabilities in Source Code
  • Chapter 20 A Web Application Hacker's Toolkit
  • Chapter 21 A Web Application Hacker's Methodology
So, these are the top 5 best hacking books on the market. There may be more fascinating books in the future that make take place in the top list. But for now, these are the best hacking books. Read and share your experience with these books.
Continue reading

FOOTPRITING AND INFORMATION GATHERING USED IN HACKING

WHAT IS FOOTPRITING AND INFORMATION GATHERING IN HACKING?

Footpriting is the technique used for gathering information about computer systems and the entities they belongs too. 
To get this information, a hacker might use various tools and technologies.

Basically it is the first step where hacker gather as much information as possible to find the way for cracking the whole system or target or atleast decide what types of attacks will be more suitable for the target.

Footpriting can be both passive and active.

Reviewing a company's website is an example of passive footprinting, 
whereas attempting to gain access to sensititve information through social engineering is an example of active information gathering.

During this phase hacking, a hacker can collect the following information>- Domain name
-IP Addresses
-Namespaces
-Employee information 
-Phone numbers
-E-mails 
Job information

Tip-You can use http://www.whois.com/ website to get detailed information about a domain name information including its owner,its registrar, date of registration, expiry, name servers owner's contact information etc.

Use of  Footprinting & Information Gathering in People Searching-
Now a days its very easy to find anyone with his/her full name in social media sites like Facebook, Instragram,Twitter,Linkdedin to gather information about date of birth,birthplace, real photos, education detail, hobbies, relationship status etc.

There are several sites like PIPL,PeekYou, Transport Sites such as mptransport,uptransport etc and Job placement Sites such as Shine.com,Naukari.com , Monster.com etc which are very useful for hacker to collect information about anyone.  
Hacker collect the information about you from your Resume which you uploaded on job placement site for seeking a job as well as  hacker collect the information from your vehicle number also from transport sites to know about the owner of vehicle, adderess etc then after they make plan how to attack on victim to earn money after know about him/her from collecting information.


INFORMATION GATHERING-It is the process of collecting the information from different places about any individual company,organization, server, ip address or person.
Most of the hacker spend his time in this process.

Information gathering plays a vital role for both investigating and attacking purposes.This is one of the best way to collect victim data and find the vulnerability and loopholes to get unauthorized modifications,deletion and unauthorized access.


Related links


Testing SAML Endpoints For XML Signature Wrapping Vulnerabilities

A lot can go wrong when validating SAML messages. When auditing SAML endpoints, it's important to look out for vulnerabilities in the signature validation logic. XML Signature Wrapping (XSW) against SAML is an attack where manipulated SAML message is submitted in an attempt to make the endpoint validate the signed parts of the message -- which were correctly validated -- while processing a different attacker-generated part of the message as a way to extract the authentication statements. Because the attacker can arbitrarily forge SAML assertions which are accepted as valid by the vulnerable endpoint, the impact can be severe. [1,2,3]

Testing for XSW vulnerabilities in SAML endpoints can be a tedious process, as the auditor needs to not only know the details of the various XSW techniques, but also must handle a multitude of repetitive copy-and-paste tasks and apply the appropriate encoding onto each message. The latest revision of the XSW-Attacker module in our BurpSuite extension EsPReSSo helps to make this testing process easier, and even comes with a semi-automated mode. Read on to learn more about the new release! 

 SAML XSW-Attacker

After a signed SAML message has been intercepted using the Burp Proxy and shown in EsPReSSO, you can open the XSW-Attacker by navigating to the SAML tab and then the Attacker tab.  Select Signature Wrapping from the drop down menu, as shown in the screenshot below:


To simplify its use, the XSW-Attacker performs the attack in a two step process of initialization and execution, as reflected by its two tabs Init Attack and Execute Attack. The interface of the XSW-Attacker is depicted below.
XSW-Attacker overview

The Init Attack tab displays the current SAML message. To execute a signature wrapping attack, a payload needs to be configured in a way that values of the originally signed message are replaced with values of the attacker's choice. To do this, enter the value of a text-node you wish to replace in the Current value text-field. Insert the replacement value in the text-field labeled New value and click the Add button. Multiple values can be provided; however, all of which must be child nodes of the signed element. Valid substitution pairs and the corresponding XPath selectors are displayed in the Modifications Table. To delete an entry from the table, select the entry and press `Del`, or use the right-click menu.

Next, click the Generate vectors button - this will prepare the payloads accordingly and brings the Execute Attack tab to the front of the screen.

At the top of the Execute Attack tab, select one of the pre-generated payloads. The structure of the selected vector is explained in a shorthand syntax in the text area below the selector.
The text-area labeled Attack vector is editable and can be used to manually fine-tune the chosen payload if necessary. The button Pretty print opens up a syntax-highlighted overview of the current vector.
To submit the manipulated SAML response, use Burp's Forward button (or Go, while in the Repeater).

Automating XSW-Attacker with Burp Intruder

Burp's Intruder tool allows the sending of automated requests with varying payloads to a test target and analyzes the responses. EsPReSSO now includes a Payload Generator called XSW Payloads to facilitate when testing the XML processing endpoints for XSW vulnerabilities. The following paragraphs explain how to use the automated XSW attacker with a SAML response.

First, open an intercepted request in Burp's Intruder (e.g., by pressing `Ctrl+i`). For the attack type, select Sniper. Open the Intruder's Positions tab, clear all payload positions but the value of the XML message (the `SAMLResponse` parameter, in our example). Note: the XSW-Attacker can only handle XML messages that contain exactly one XML Signature.
Next, switch to the Payloads tab and for the Payload Type, select Extension-generated. From the newly added Select generator drop-down menu, choose XSW Payloads, as depicted in the screenshot below.


While still in the Payloads tab, disable the URL-encoding checkbox in the Payload Encoding section, since Burp Intruder deals with the encoding automatically and should suffice for most cases.
Click the Start Attack button and a new window will pop up. This window is shown below and is similar to the XSW Attacker's Init Attack tab.


Configure the payload as explained in the section above. In addition, a schema analyzer can be selected and checkboxes at the bottom of the window allow the tester to choose a specific encoding. However, for most cases the detected presets should be correct.

Click the Start Attack button and the Intruder will start sending each of the pre-generated vectors to the configured endpoint. Note that this may result in a huge number of outgoing requests. To make it easier to recognize the successful Signature Wrapping attacks, it is recommended to use the Intruder's Grep-Match functionality. As an example, consider adding the replacement values from the Modifications Table as a Grep-Match rule in the Intruder's Options tab. By doing so, a successful attack vector will be marked with a checkmark in the results table, if the response includes any of the configure grep rules.

Credits

EsPReSSO's XSW Attacker is based on the WS-Attacker [4] library by Christian Mainka and the original adoption for EsPReSSO has been implemented by Tim Günther.
Our students Nurullah Erinola, Nils Engelberts and David Herring did a great job improving the execution of XSW and implementing a much better UI.

---

[1] On Breaking SAML - Be Whoever You Want to Be
[2] Your Software at My Service
[3] Se­cu­ri­ty Ana­ly­sis of XAdES Va­li­da­ti­on in the CEF Di­gi­tal Si­gna­tu­re Ser­vices (DSS)
[4] WS-Attacker
More articles

  1. Blackhat Hacking
  2. Hacking Attacks
  3. Hacking Books
  4. Paginas De Hacking

How To Recover Files That Are Deleted From Recycle Bin

How To Recover Files That Are Deleted From Recycle Bin

How To Recover Files That Are Deleted From Recycle Bin

How To Recover Files That Are Deleted From Recycle Bin

Well, Windows users have a bad habit of removing files from recycle bin. Deleting useless files from Recycle Bin helps a user to save some storage space which can improve the speed of a computer. However, Windows users do that more frequently and later regret. Actually, Recycle Bin is a place from where we can get back our deleted files and folders.
Sometimes, we accidentally delete our important files and folders and due to some reason we lose them from Recycle bin too! At that time, we search for recovery methods. Well, there are many methods available over the web which can help you to recover deleted files from computer, but, when it comes to reliability, nothing can beat EaseUS.

What Is EaseUS Data Recovery Wizard?

EaseUS is one of the leading software providers which is known for its data recovery programme. EaseUS offers some free data recovery software that can help you to recover deleted, formatted or lost data from PC, laptop or removable device easily and quickly.
One of the best thing about EaseUS is that it provides tools for recycle bin recovery which can help you to get back files that you have deleted from the Recycle bin itself. EaseUS Data Recovery Wizard free can easily recover lost files, pictures, documents, videos and more from deleting, formatting, partition loss, OS crash, virus attack and other data loss cases.

How To Recover Deleted Files?

If you are struggling to get back your lost data files, then here is an easy data recovery method which will help you to get back deleted files on your computer. Below, we are going to share a mini guide on how to use EaseUS Recycle Bin Recovery to get back your deleted data.
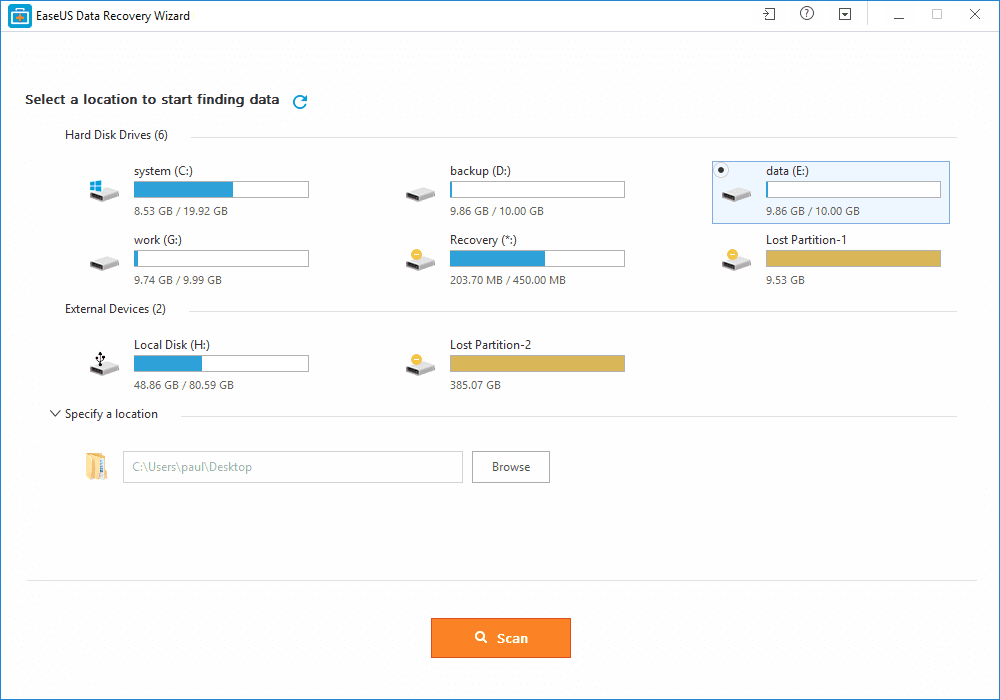
Step 1. First of all, you need to download and install EaseUS Data Recovery Wizard on your Windows computer and then launch it normally. You need to select the location where you want to scan and then click on 'Scan'
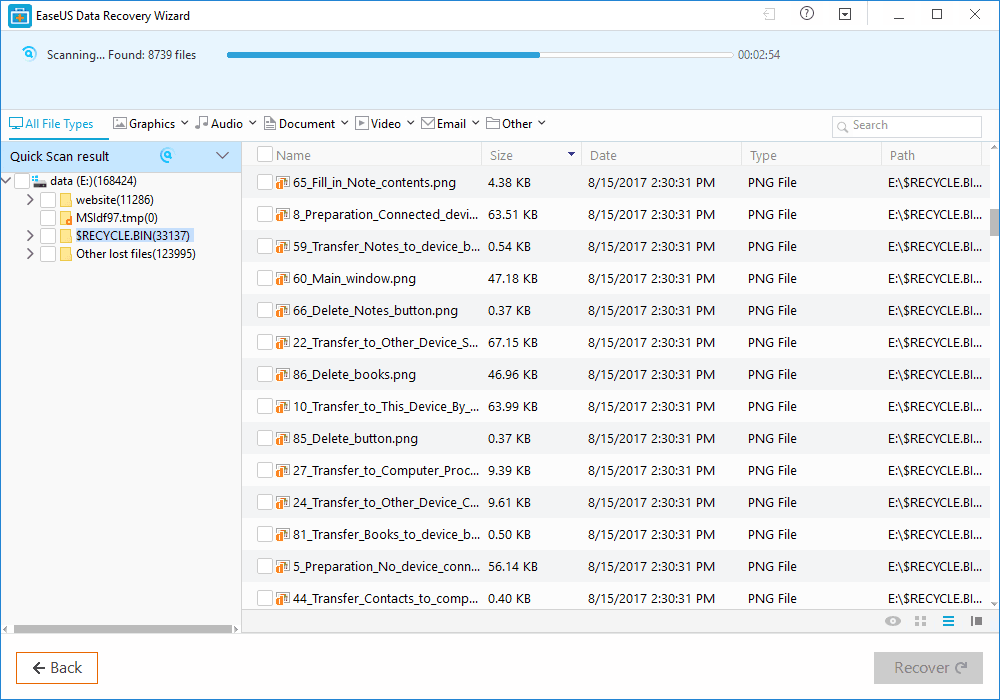
Step 2. Now, wait for few minutes until the tool finishes scanning your drive. The tool search for files that got deleted or cleaned from the Recycle Bin.
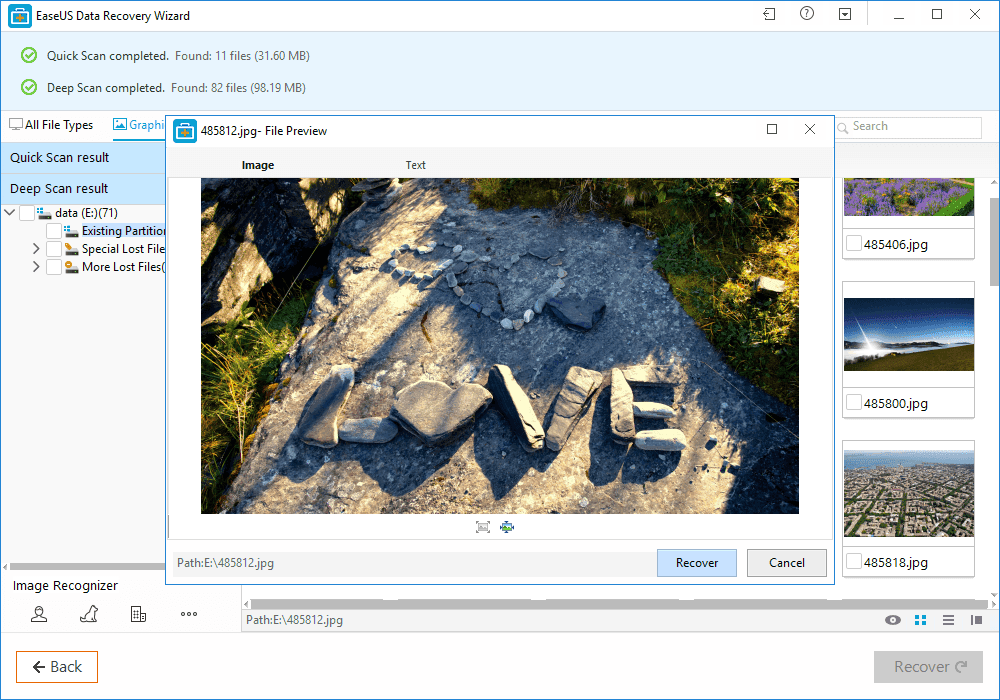
Step 3. Now it will show you files that you can recover. Here you need to click on the file which you want to recover and click on 'Recover'
That's it, you are done! This is how you can use EaseUS data recovery to get back your deleted files on your computer.

Benefits of EaseUS Data Recovery

Well, the data recovery tool provided by EaseUS comes with many benefits. It can not only recover accidentally deleted files, but it can also recover data in case of Virus Attacks, Hard Disk Damage, OS Crash etc.
You can also use this awesome data recovery wizard to recover deleted files from External Disk, USB Drive, Camcorder, Mobile Devices, Zip Drive, iPod, Music Player and more.
Overall, this is one of the best data recovery tools you can have on your Windows computer. EaseUS Data Recovery also has a free version with restricted features. Overall, this is a stress-free solution to get back your deleted files

Related articles


  1. Nfc Hacking
  2. Libros Hacking
  3. Computer Hacking
  4. Que Hay Que Estudiar Para Ser Hacker
  5. Cosas De Hackers